A little over a decade ago I did a lot of business applications with .NET Framework WPF and ClickOnce was in many cases used as a convenient way to deploy and update Windows applications. ClickOnce hasn't gotten much love over the years, and when .NET Core 3 introduced support for WPF applications ClickOnce support was nowhere to be found. But guess what, that's changed with .NET 5 and in this post, I'll go through my recipe for simplifying the building and publishing .NET 5 Windows application using GitHub Actions, Cake, and ClickOnce to Azure Blob Storage.
Cake Recipe?
So what is a Cake recipe? Regardless of what it sounds like, it in this case has nothing to do with baking, but it's a set of Cake scripts packaged as NuGet package and published on NuGet.org, providing a highly reusable way to with just a few lines of code get access to rich functionality.
For example this recipe will for a .NET 5 based Windows application, in a very optioned way
- Version application
- Build application
- Create ClickOnce assets
- Deploy to Azure Blob storage
Sample application
For simplicity I'm here going to use the standard .NET 5 WPF template, using .NET CLI that would look something like below
dotnet new wpf -n MyApp
dotnet new sln -n MyApp
dotnet sln add MyApp/MyApp.csproj
Which essentially:
- Creates project
- Creates solution
- Adds project to solution
Which is similar to New Project -> WPF Application (C# / Windows / Desktop .NET Core)

Resulting in a bare minimum folder/file structure like below
src
 │    MyApp.sln
 │
 └─── MyApp
        App.xaml
        App.xaml.cs
        AssemblyInfo.cs
        MainWindow.xaml
        MainWindow.xaml.cs
        MyApp.csproj
Adding Cake.ClickOnce.Recipe
Now that we have our sample application, let's rub some DevOps on it using Cake.ClickOnce.Recipe.
Prerequisites
Tools
To run our recipe we need one .NET tool installed
- Cake.Tool 1.0.0 or newer
My preferred way is to install using a .NET tool manifest in repo root, so the tools are versioned and restored within the repo, a manifest is easiest created using the .NET CLI template tool-manifest:
dotnet new tool-manifest
and then install the tool
dotnet tool install Cake.Tool
Azure
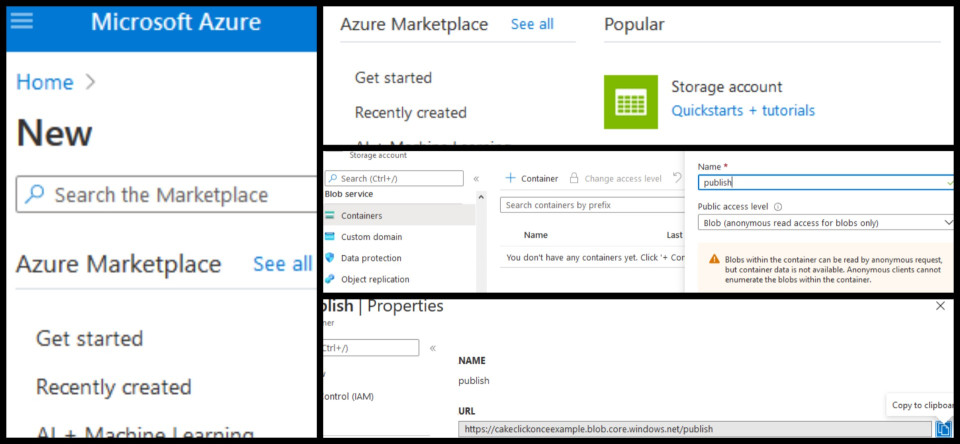
The recipe uses Azure Blob Storage to distribute the application and ClickOnce manifest, so you'll need to create:
- Azure Storage Account
- Container with anonymous read access for blobs only
Adding recipe
In repo root create a build.cake file containing
#load "nuget:?package=Cake.ClickOnce.Recipe&version=0.2.0"

ClickOnce.ApplicationName = "MyApp";
ClickOnce.Publisher = "devlead";
ClickOnce.PublishUrl = "https://cakeclickonceexample.blob.core.windows.net/publish";
ClickOnce.RunBuild();
The Recipe has three required settings
ApplicationName- in general same as project namePublisher- name of publisherPublishUrl- base url for where application is installed from, in this case Azure Blob Storage container url
Local build
We're now all set to kick of a local build using Cake
dotnet cake
and if all goes well you should see something like below
Task                           Duration
---------------------------------------------------
Setup                          00:00:00.0070864
Clean                          00:00:00.0114975
Restore                        00:00:01.0136714
Build                          00:00:02.6537503
Publish                        00:00:00.9728737
ClickOnce-Launcher             00:00:00.3629962
ClickOnce-Application-Manifest 00:00:00.5536790
ClickOnce-Deployment-Manifest  00:00:00.5924181
---------------------------------------------------
Total:                         00:00:06.1730701
and a new folder in repo root called artifacts containing application ClickOnce manifest and a date versioned folder (you can override the generated version using ClickOnce.Version property).
artifacts
 │   MyApp.application
 │
 └───MyApp.2021.01.31.25014
        Launcher.exe
        MyApp.deps.json
        MyApp.dll
        MyApp.exe
        MyApp.manifest
        MyApp.pdb
        MyApp.runtimeconfig.json
GitHub Actions
A fairly minimal GitHub Actions could essentially be
- Checkout source
- Install .NET SDK
- Install & Execute Cake
Build definition
The yaml build definition could look something like below
name: Build
on:
  pull_request:
  push:
    branches:
      - main
      - develop

jobs:
  build:
    name: Build
    runs-on: windows-latest
    steps:
      - name: Get the sources
        uses: actions/checkout@v2

      - name: Install .NET Core SDK
        uses: actions/setup-dotnet@v1

      - name: Run Cake script
        env:
          PUBLISH_STORAGE_ACCOUNT: ${{ secrets.PUBLISH_STORAGE_ACCOUNT }}
          PUBLISH_STORAGE_CONTAINER: ${{ secrets.PUBLISH_STORAGE_CONTAINER }}
          PUBLISH_STORAGE_KEY: ${{ secrets.PUBLISH_STORAGE_KEY }}
        run: |
          dotnet tool restore
          dotnet cake
The Run Cake script step has three environment variables defined
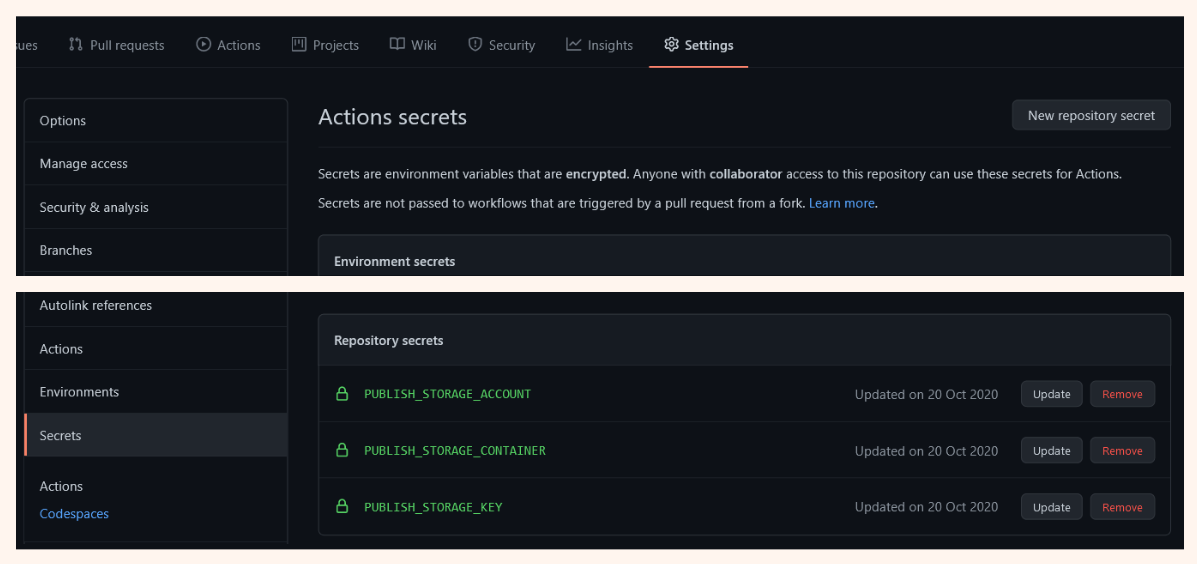
PUBLISH_STORAGE_ACCOUNT- Azure storage account name i.e.cakeclickonceexamplePUBLISH_STORAGE_CONTAINER- Azure storage container name i.e.publishPUBLISH_STORAGE_KEY- Azure storage account secondary or primary key.
These are fetched from your GitHub repo settings Secrets section, which means they're not publicly stored anywhere in the repo and also not available from pull requests.
Output Example on GitHub Actions
The recipe will automatically identify that it's executing on GitHub Actions, and execute a few extra steps to upload and point the ClickOnce manifest to the new version.
If all goes well GitHub Actions output would look something like below
----------------------------------------
Setup
----------------------------------------
Setting up version 2021.01.27.18139
▶ "Clean"
▶ "Restore"
▶ "Build"
▶ "Publish"
▶ "ClickOnce-Launcher"
▶ "ClickOnce-Application-Manifest"
▶ "ClickOnce-Deployment-Manifest"
▶ "ClickOnce-Deployment-UpdateManifest"
▶ "ClickOnce-Deployment-CreateAppRef"
▶ "ClickOnce-Upload-Version"
▶ "ClickOnce-Upload-Application"
▶ "Publish-ClickOnce"

Task                                Duration
--------------------------------------------------------
Setup                               00:00:00.0160939
Clean                               00:00:00.0084806
Restore                             00:00:02.1274733
Build                               00:00:03.3076849
Publish                             00:00:01.2192429
ClickOnce-Launcher                  00:00:00.4506914
ClickOnce-Application-Manifest      00:00:00.6510728
ClickOnce-Deployment-Manifest       00:00:00.9086913
ClickOnce-Deployment-UpdateManifest 00:00:00.6800874
ClickOnce-Deployment-CreateAppRef   00:00:00.0112772
ClickOnce-Upload-Version            00:00:02.1736495
ClickOnce-Upload-Application        00:00:00.6269294
--------------------------------------------------------
Total:                              00:00:12.1814083
and you now have a fully automated build and release of your ClickOnce application.
Installing application
The recipe will automatically generate an appref-ms file, downloading and opening this file from blob storage is enough to trigger the ClickOnce runtime and install the application.
Example: cakeclickonceexample.blob.core.windows.net/publish/MyApp.appref-ms
Conclusion
Long story short, the recipe greatly simplifies the automation of building a WPF application, getting it published and deployed using ClickOnce technologies - achieving this only configuring the bare minimum what's needed to do so.
There's still a lot of work to do with the recipe especially around signing, icons, etc.
That said it's fully functional and a good starting point. The recipe is open source, so I'll happily take feedback and contributions to improve it.
Resources
- Recipe source on GitHub - github.com/devlead/Cake.ClickOnce.Recipe
- Recipe on NuGet.org - nuget.org/packages/Cake.ClickOnce.Recipe
- Example repository on GitHub - github.com/devlead/Cake.ClickOnce.Recipe.Example
- Cake - cakebuild.net
This post is licensed under a Creative Commons Attribution 4.0 International License